We like the idea of visualizing application data with JavaFX. JavaFX makes it easy to add effects such as drop shadows, background gradients, and reflection to window content. You can also apply animations to rotate, scale, fade in or out, and move JavaFX elements. And, JavaFX is a viable solution if your visualization requirements include charts or 3D. In this post, we discuss some of the issues you will encounter when integrating JavaFX content in a NetBeans Platform application.
Here are two examples of NetBeans Platform applications with integrated JavaFX content.
Figure 1 shows a NetBeans Platform window displaying a JavaFX pie chart, with one of its slices animating after a mouse click.
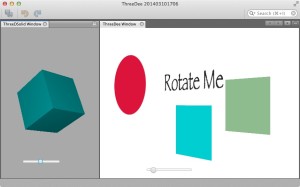
Figure 2 shows a NetBeans Platform application with JavaFX 3D content. The left window shows the 3D Box primitive, which rotates when the window’s slider is adjusted. The right window shows 2D shapes with different depths in 3D space that also rotate when the slider is adjusted.
What Is the NetBeans Platform?
The NetBeans Platform provides a rich client framework for desktop applications. Based on Swing, the NetBeans Platform includes a module system, window system, action framework, menu and toolbar system, and a sophisticated communication system that lets you keep your application modules cohesive and loosely coupled.
You create windows in a NetBeans Platform application with a TopComponent, a Swing-based class that extends JComponent. A TopComponent is automatically integrated into the NetBeans Platform window system, which means that you can float, dock, minimize, maximize, resize, and select arbitrary objects from the window, making them available application wide. Great! But what’s the best way to add JavaFX content to a NetBeans Platform window?
The good news is that you can easily target individual windows for JavaFX content in NetBeans Platform applications. You don’t have to convert your entire application.
The Magic of JFXPanel
JFXPanel is a Swing component that holds a JavaFX scene graph, the UI model that JavaFX uses to build and manipulate content. JFXPanel initializes the JavaFX runtime for you and transparently forwards all input (mouse, key) and focus events to the JavaFX runtime. This event handling lets the embedded JavaFX content respond seamlessly to mouse clicks and other events.
Both Swing and JavaFX are single-thread UI toolkits. You must be in the Swing Event Dispatch Thread (EDT) to manipulate Swing content. Similarly, you must be in the JavaFX Application Thread to manipulate JavaFX content. When you are working with applications that mix Swing and JavaFX, you must execute code in the correct thread.
To manipulate the Swing UI from JavaFX, wrap the code in a Runnable and use SwingUtilities.invokeLater(). (Lambdas help reduce boilerplate code here.)
SwingUtilities.invokeLater(() -> {
// Change Swing UI
});
Conversely, to manipulate the JavaFX UI from Swing, wrap the code in a Runnable and call Platform.runLater().
Platform.runLater(() -> {
// Change JavaFX UI
});
Now that you have this bit of background, let’s show you how to embed JavaFX in a NetBeans Platform TopComponent window.
Keep ‘Em Separated
Instead of using Java APIs to add and configure JavaFX elements directly in a JFXPanel, we recommend using FXML with an FXML controller class. This approach has several advantages.
- You can use the stand-alone Scene Builder application to drag and drop components while you build and configure JavaFX content.
- FXML (with or without Scene Builder) helps you better visualize JavaFX content. FXML also makes it easier to configure scene graph elements, since you don’t have to create objects and call setters in Java.
- The JavaFX code is separate and isolated from the TopComponent Swing code. Since you are integrating two different UI APIs in a single application, the code will be much easier to read and maintain with FXML.
- If you already have an FXML document and controller class, it is straightforward to port this code to a NetBeans Platform module.
The Mechanics—How Do I Do It?
Here are the general steps to build a NetBeans Platform application with JavaFX content.
- From the NetBeans IDE, create a NetBeans Platform Application project.
- Create a new module in the application.
- Add a window (TopComponent) to the module.
- Add JavaFX content to the TopComponent using Swing component
JFXPanel.
In the last step, we prefer to use FXML with an FXML controller class. By instantiating the FXMLLoader, you can access the associated FXML controller with the getController() method. Here is the TopComponent code to build JavaFX content for a NetBeans Platform window called “MyFXTopComponent.”
. . . TopComponent annotations omitted . . .
public final class MyFXTopComponent extends TopComponent {

    private static JFXPanel fxPanel;
    private MyFXController controller;

    public MyFXTopComponent() {
        initComponents();
        setName(Bundle.CTL_ThreeDeeTopComponent());
        setToolTipText(Bundle.HINT_ThreeDeeTopComponent());
        setLayout(new BorderLayout());

        init();
    }

    private void init() {
        fxPanel = new JFXPanel();
        add(fxPanel, BorderLayout.CENTER);
        Platform.setImplicitExit(false);
        Platform.runLater(() -> createScene());
    }

    private void createScene() {
        try {
            URL location = getClass().getResource("MyFX.fxml");
            FXMLLoader fxmlLoader = new FXMLLoader();
            fxmlLoader.setLocation(location);
            fxmlLoader.setBuilderFactory(new JavaFXBuilderFactory());

            Parent root = (Parent) fxmlLoader.load(location.openStream());
            Scene scene = new Scene(root);
            fxPanel.setScene(scene);
            controller = (MyFXController) fxmlLoader.getController();

        } catch (IOException ex) {
            Exceptions.printStackTrace(ex);
        }
    }
. . . other TopComponent code omitted . . .
}
Notes
- This code uses file MyFX.fxml to describe the JavaFX scene graph content.
- This code uses file MyFXController.java as the
MyFXControllerclass. - The BorderLayout (line 11) in the TopComponent keeps its content nicely centered when you resize a window.
setImplicitExit(false)(line 19) keeps the JavaFX Application Thread from terminating when the last window with JavaFX content closes.- Method
createScene()(line 20) is invoked on the JavaFX Application thread withPlatform.runLater(). - Private variable
controllerwill not be immediately available in the TopComponent (line 33). If immediate access is required, use a Countdown latch and wait forcreateScene()to finish. (We’ll show you how to do this in Part 2.)
Our next post will discuss communication strategies that you can use with JavaFX and Swing.
We discuss integrating JavaFX into NetBeans Platform applications in detail in our book JavaFX Rich Client Programming on the NetBeans Platform (see especially Chapter 6).


Pingback: Java desktop links of the week, August 3 « Jonathan Giles
Pingback: JavaFX links of the week, August 3 // JavaFX News, Demos and Insight // FX Experience