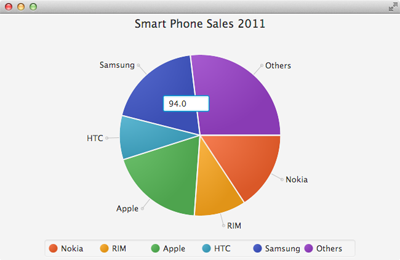
Our previous post described how to animate a Pie Chart wedge. Once you have access to the wedge’s node, you can add effects (perhaps a drop shadow effect to highlight), animation (as shown), or display a selected wedge’s value in a separate label. Here, we’ll show you how to add in-place editing to our example PieChart application.
Figure 1 shows the application with a TextField control in the Samsung wedge displaying the current pie value. Our example already has mouse-click animation, so we need another way to indicate editing. A mouse click event provides several options, including right-click, control-click, or ALT-click. We’ll use control-click, which lets the user place the cursor inside a wedge, hold the control key, and then click the mouse.
The mouse event handler pops up a TextField at the mouse click location and initializes the text property to the node’s pieValue property. The TextField action event handler (invoked when the user types the Enter or Return key) reads the value from the TextField, updates the PieChart data’s pieValue property, and fades out the TextField.
Here is the updated PieChart.fxml showing the TextField (lines 6-8). Note that the FXML includes attribute fx:id to reference this control in the Java controller code. We provide a maximum width and set its opacity to 0. This hides the control until the user requests editing.
<StackPane id="StackPane" prefHeight="400" prefWidth="650"
           xmlns:fx="http://javafx.com/fxml/1"
           fx:controller="piechart.PieChartController">
    <children>
        <PieChart fx:id="chart"  />
        <TextField fx:id="textField"
                   maxWidth="75"
                   opacity="0.0" />
    </children>
</StackPane>
Recall that StackPane centers its children by default, so the TextField would appear centered on top of the chart if it were visible.
Now let’s show you the modified Java controller code. The private class variable textField has an @FXML annotation (lines 5 and 6) and the initialize() method configures the PieChart with the sales data. This method invokes setUpAnimation() to process the individual wedge mouse clicks (line 21).
public class PieChartController implements Initializable {

    @FXML
    private PieChart chart;
    @FXML
    private TextField textField;
    private ObservableList<PieChart.Data> pcData;

    @Override
    public void initialize(URL url, ResourceBundle rb) {
        // Add data to the observable list
        pcData = FXCollections.observableArrayList();
        pcData.add(new PieChart.Data("Nokia", 77.3));
        pcData.add(new PieChart.Data("RIM", 51.1));
        pcData.add(new PieChart.Data("Apple", 93.2));
        pcData.add(new PieChart.Data("HTC", 43.5));
        pcData.add(new PieChart.Data("Samsung", 94.0));
        pcData.add(new PieChart.Data("Others", 132.3));
        chart.setData(pcData);
        chart.setTitle("Smart Phone Sales 2011");
        setupAnimation();
    }
Here’s the setupAnimation() method that processes both the control-click for in-place editing and the normal click for the wedge animation (unchanged).
    private void setupAnimation() {
        pcData.stream().forEach(pieData -> {
            pieData.getNode().addEventHandler(MouseEvent.MOUSE_CLICKED, event -> {
                if (event.isControlDown()) {
                    // Move the textfield to where the mouse click is
                    textField.setTranslateX(event.getSceneX() - textField.getLayoutX());
                    textField.setTranslateY(event.getSceneY() - textField.getLayoutY());
                    textField.setText(String.valueOf(pieData.getPieValue()));
                    textField.setOpacity(1.0);
                    textField.setOnAction(evt -> {
                        try {
                            System.out.println("You entered: " + textField.getText());
                            final Double num = Double.valueOf(textField.getText());
                            if (num > 0) {
                                pieData.setPieValue(num);
                                resetTextField();
                            } else
                                textField.setText(String.valueOf(pieData.getPieValue()));
                        } catch (NumberFormatException e) {
                            // Just use the original number if the format is bad
                            textField.setText(String.valueOf(pieData.getPieValue()));
                        }
                    });
                } else {
                    resetTextField();
                    . . . unchanged code omitted . . .
                }
            });
        });
    }
First, we add a mouse click event handler to each pie wedge node using the stream and forEach functional operations in a lambda construct. If the user presses the control key with a mouse click, we provide the in-place editing. The handler moves the textField control to the mouse click location, sets the text property to the data’s pieValue, and makes the control visible (lines 6-9).
When the user hits the return or enter key, the textField’s onAction event handler is invoked (line 10). Here, we convert the input string to a double. We keep the original value if the number is negative (line 18) or if the conversion fails (line 21). If the conversion succeeds, the appropriate pieValue property updates (line 15) and we invoke the resetTextField() method, shown here.
    private void resetTextField() {
        FadeTransition ft = new FadeTransition(
                Duration.millis(1000), textField);
        ft.setToValue(0.0);
        ft.playFromStart();
        ft.setOnFinished(event -> {
            textField.setTranslateX(0);
            textField.setTranslateY(0);
        });
    }
The resetTextField() method builds a FadeTransition animation to fade out the TextField control when editing is complete. The TextField returns to its original location when the transition finishes (line 6).
Note that when the pie wedge value updates, the PieChart redraws itself with animation as each wedge forms its new shape.
You can download the complete PieChart2.zip example here.

